Tuesday, November 30, 2010

Day 52: Creating a VEX operator

VEX-(Vector Expression) It's the shading

Modifying the particle attributes. VEX does not create data.. it modify data
Two types:
VEX is the code and VOP- Visual operators
Propose to define new SOP operator.

Getting started with VEX in the network view. press tab and type "SOP type" to add the SOP operator. right click and create new to "SOP" operater in th eproperties tab type "deformer" as the name of the operater.
Dig in to the node, press tab and type "multiply" to add the vop operator.
press tab and type "parameter" to add the vop operator.
language it extended to other objects like Geometric points, particles, pixels etc.

Open one more network view to add the "geometry" node. dig in to the "geometry" node. delete the "file1" node and add the " grid1" node.
at the output of the "grid1" node press tab and type "deformer" to add the "sop" node we created. from the properties we able to change the size of the grid using the "defromer " VEX operater.

Monday, November 29, 2010

Day 51: Using the fur

Open the file fur_start.hip, it's nothing but an human head.
make sure that in object level of individual items the geometry file is liked to the object.

later from the fur tool, select add fur to object it gives an a brush , it add's fur to whole object. then use paint density tool to adjusting the proper size of the brush we able to paint the fur on the area we would like to add or remove the fur. we also able to use "paint length tool" to incrise and devrise the length of the fur.

Final touches are be given by using comb th hair, add the color to the hair in required direction then use the "Depth of shadow" map to make rendering more faster..add camera and render the sequence..

Friday, November 26, 2010

Day 50: Animate mouse and render the sequence.

Houdini has a good procedural animation tecnique which able to multiply and animate the mouse.

Create a simple encloser using the box and extreude it also create a grid as a base. from the base grid, add  and null as a emitter of particles.
Number of particles emits at frame One is 25 and frame Two is 0, we control the numbers using the animation key frames.

later use the instance and attached the mouse to the particle. so mouse follow the particle path. some of the mouse are colliding each other so add the collision node, and incrise the collision tolerance to 0.5. so before they collide they move away. then also add interact nod eso it affect the individual interaction with the mouse. lastly add the speed limit node to control /reduce the speed of the mose running around.

lastly, add lights and camera in to animation to add some realastic effects of material and lights.This exercise is very good if people would like to explere the procedural work flow of houdini.


Thursday, November 25, 2010

Day 49: Animate key and mouse tail using channel editor

Open mouse_anistart.hip. to animate the key select the key and use transform node in the properties change the rotation sequence to Ry,Rx,Rz
then in Rx use expression $F*5 where they key able to rotate for th ewhohe timeline sequence that is 240 frames.

next task is to create use the bones to animate the tail so we create a 24 frames animation of one cycle. wher ekey can rotate from left to right and back.


this cycle need to change the value a bit so on frame 12, Change the parameter values of four bones by offset them a bit.
last part is to repeat the cycle for whole length. this one id done by using the channel editor, where we able to move the mouse left and right scene for the whole 240 frames of the animation the loop we use the expression  repeat(start frame,end frame)

Test the animation using the scene viewer.

Wednesday, November 24, 2010

Day 48: UV unwrap and apply textuer to mouse

Started with the full mouse model file modelUV_start.hip


In houdini the UV maping is bit simpler as it's a node based. select the key model in scene view by choosing points and select uvproject from the texture shelf. all the points will we projectes in the UV view.
Make sure you aline the key in the top left as there are other objects going to come in.

select the mosue body project on XY plane and see the body in the UV plane. next one to seect the mouse tail,
select the tail using premitive mode and view in the UV view and move down at the bottom. next one select the ear..
this work a bit different than the other nodes. select the ear baseic node that is "cap" then use UV unwarp.. to unwrap the uV then use UV transform node to move and scale the objects in the UV view.


after doing all the UV unwrap right click on the merge nod eto save the TGA or JPG file. this file we able to do touch up using phototoshop or any image editing software.


To apply the texture.. create the mantra material and add color map to assign the color map path also apply amaterial in the material to appy to object.
Rensder the save the final render file with subdivide node.

Tuesday, November 23, 2010

Day 47: Modelling a mouse toy

Modelling a mouse toy has 4 differnt parts of the body.
Main body, Nose, Ear and key


I started with modelling the main body of the mouse. Take a basic sphere shape then modify the sphere in she shape of mose as shown in the picture above.
the body is more tapering towerds the start of the more rounded towers the back of the body.
At the more rounded side of the mouse body seelct the center polygone and use poly extrude to scale it down. also use another poly extrude to extrude the polygone to convert it in to a tail. see th emouse pic below.


As the base body is ready, next part is to create a ear for mouse using NURBS.
create a simple NURBS curve using 6 poinnts duplicate the curve using peak node. merge the both curve and add skin node to create the surface and cap node to close the inbetween gap.
then use transform node to move to the front of the mouse body and scale and rotate to aline in the front of the mouse. onece aline the ear use the mirror node to mirror ear to the next side of the mosue body. 

next thing is to create the mouse nose and aline it to the front of the mosue
Us esphere node to create the nose and applied transform nod eto aline it to the front of the mouse.

next one is to create a key to the mouse toy. so it starts with the basic node box. change the box to polygonal mesh to do edit it.
change the axis division to 2,4,2 so that we able to ge tthe vertical key height.
use poly extrude to extude the polygone to get the key head.
Create another box and keep in the center of the Key head. then use cookies node to substract A minus B so we able to see the key with a hole in between.
then add divide node to clean out the extra poits or polygone so it look more neat.

At the end of all the individual objects, press tab and add "null" node and rename it "mouse_body","mouse_ear","mouse_nose","mouse_key" and merge them all to merge node. lastly aline the key to the back end of the mouse as shown in the image and use subdivide node to smooth the whole mouse object.

Monday, November 22, 2010

Day 46: Modelling a cheese

Start with a basic tube, change to polygone and reduce the colomns to three and add on the caps to create the basic cheese shape.


later add fuse node to merge the extra points, and divide node, cleanup polygons: fix concave polygons, divide N-side polygons into triangles.
so it creates the smooth nice cheese shape
also we can add an "transform node to move the cheese up above the grid line.


To make holes in the cheese we use metaball node. use scatter node to convert the cheese geometry in to poits format then use copy SOP to merge the two nodes  so  we able to see the metaballs in the cheese shape.


Actual cheese has holes in to the shape, so to make the shape reverse we use cookies node and minus the metaball from the cheese geometry to look like a cheese has holes in side.

Friday, November 19, 2010

Day 45: Digital Interactive Gamming, London, Ontario, Canada- Day 02

After the first heavy day.. day two start with a great enthusiasm as morning the first presentation is allocated to Sidefx software Toronto.

9:00 AM : Going Procedural A better way to make better games by Dr. Paul Salvini, Sidefx Software
Dr. Paul started his presentation by giving his personal experience he presented a week back in the APEC SME Summit in Japan. He said "In the developing Canadian economy SME's in Games Industry are playing an impotent role in creating the jobs as well as leading the  local game market.

Further he describe the importance of procedural in game development. Rob has shown a quick demo of how to create a simple object break in to the pieces by using houdini's fracture and rigid bodies dynamics.


Dr. Paul further enhance Houdini Software as a 3D animation and high end VFX fool is adopted by top companies in the world and also by leading game design companies. Houdini has a collaborative work flow which suites in game production. Capital and efforts nee dto be combine in this part of the region. London has a good synergy in studios and LEDC wants this place as a local hub for game companies so use proper tool to ride the wave of success.


10:00 AM: Nailing the Sale in the Tough Market
Moderator : Sean Murch , Next level Games
Member
Julian Spillane, Frozen North Productions
Tonya Constant, The Ant Firm
Damir Slogar, Big Blue Bubble


This is a more Q&A type of session where the student's from colleges and other members will ask questions and the panel will answer them.
What is the main purpose of creating a good game: sale games to make some good profit.
From the student perspective when he or she look job in game company what they look for: they should look for work experience, sometime create the portfolio in which they would like to work.
When should student able to start his or her game company?: Need to have confidence and a good team with different skills so able to start the company but make sure you got enough resources to sustain the company for at lest 2-3 years.
finally Moderator conclude by saying let's make London as a best place to make best games.


11:30 AM Economic Trends and Demographics for the Game Industry
Speacker : Jess Divinch EEDAR

Jess Started his presentation showing the Statistic of sale of the games relesed from OCT05 to OCT10.
To sustain in the game industry, Building an brand equity and Strong consumer promise is impotent.
he explain the scenarios using different examples on the matrix of consumer promise vs brand stamina

low consumer promise / low brand stamina: games easy to make need less money and time as no storyline and no story line more structured eg: fruit ninja,Tetris, chess etc.
high consumer promise / low brand stamina: games not easy to make need  money and time as no storyline but more simulation. so they become more popular games but can't sustain for long time eg: Guitar hero, first person shooter games.
low consumer promise / high brand stamina: games not easy to make need  money and time as they have storyline but less simulation. These games are ever green but not many people buy. eg: transformers, maple leaf sports games.
high consumer promise / high brand stamina: games need more money and time as they have simulation and storyline. Games are more popular so make good sales. . eg: counter strike, games on celebrities etc.

Finally he conclude as "Understand your target market by understanding the target audience and consumer promise. Once the promise is establish it's difficult to change so if fails..move on."


12:00 PM to 1:00 PM lunch Break

 Anna from San Six Games Vancouver BC


 Operation Manager from Digital Extremes

1:00 PM: Ontario Media Development Council case study speaker : kim gibson

 Kim given a broad over view about the  ODMC, it's a sponcer for 33 project in 5 different categories. One of the project was "Antic Entertainmnet" which is a game development company.
the founder Fredrik Liliegren has given a brief overview about how he approch the OMDC and what are the main points to note.
He suggested he was the first few members to apply whenever they open the application, His company is 3 years old and well extablish got few IP's, lastly his company product's has some commercial purpose value.

During the Q& A session student ask
What are the main things to consider if you pitch for game publisher?
1.Who we are targeting
2.What type of game publisher
3.Lead a question to put on co-operation.

How to improve the contact circle
Be where the game people are always to build the network slowly.
Join the Game connection

What type of game portfolio must develop.
Build the x box indie game even student able to develop the character and sale it.
must have passion for games and able to communicate well in team.


3:00 PM  After the tea break we check out the hotel and left on way to Toronto another three hours drive back to Toronto.
On the way Kim was discuss with me related to his experience with DIG London.
It was a fruitful experience for me I learned a lot new information and knowledge which I able to share with my student's in Singapore.

Thursday, November 18, 2010

Day 44: Digital Interactive Gamming, London, Ontario, Canada- Day 01

Early morning @ 6 AM, Kim and I started to head to the London, Ontario.


It was a bit chill morning temperature was around 5C but bit windy.
On the way as we reached “Brampton”,  Kim informed me “ this area has more as a farms, they grow corns, grains and vegetable” but now the trees have no leaves all look like dead trees. May be prepared for winter.

 
Around 8:15 AM, we reached to the “London convention Centre”, Bill and Rob from Sidefx office already there to welcome us and help us to move the materials from car to Houdini booth.


 We done the registration and I got the new DIG tag for the two days event. The event was split in to the two halls; One hall is called “Fan show Game expo” where all the games from different platform are showcased for visitor to use.
Other hall is for conference, where the DIG conference event was held according to the schedule.


8.45 AM:  Event Opening.
The opening address delivered by Mr. Peter White from London Ecommic Development Council. He emphasise the importance of London as a main hub for gamming in Ontario and in Canada.


9:00 AM : Cloud Computing
The secession presented by “Denis Dyack” from Silicon Knights.
He present some of his research and predict about the feature of the Game Industry after 10 years. According to his studies, the game Technology will based on anywhere, any device, anytime and disk less it called cloud. Like today’s email app. We read emails from servers, so feature devices will be disk less and people will play games in less prices some time free.  They will collect some kind of credits at the end of each sessions and this can convert to allow them to play new games or advance levels etc. Denis also predict that the new copyright rules and laws need to be evolved.
During the QA session people asked about the validity of his prediction, In the reply “Denis Dyack” said it based on his research on Game industry in past and technology evaluation of the feature”


10.15 AM: Surprise Your Production Pipe!
The secession presented by “Paul Martin” Director of Technology from Slant Six Production from Vancouver B.C.
Paul started with the brief history of Game evaluation production and then he covers the topic about “Technical details in Game development pipeline” He covered topics such as
Infrastructure:  for a good Game design company need a good Infrastructure in all skill levels like Art and programming track  
Game asset creation: Every one must clear about the task to do and the file format to save. The asset management can be done in central location and accessible to all

Game run time: if user hit delete key the action should take place in 30 sec. If user done some change the action should take place less than 5 sec. He also emphasizes the Importance of Game testing like test the game and tests the memory uses of the game.
He also recommend the way to do this at the start when you load the game ask user to save the game first.  This process will allow computer to load only required processes and stop loading the unwanted processes.
Organising Assets: By Metadeta- assets in XML By Directories: Images and rest format can be saved in directories.
Game Packages: few formats to save the data Zip/ RAR, PSN package, XBL package
Game sharing: Done on the shared game server mainly (P4 Proxy) package drop, FTP and HDD cover 


11:15 AM: Studio Owners Panel
Chaired by 3 SME game studios owner. two from Ontario and one studio from BC. And  topics discussed
Game Market in Ontario and Canada: Games are not new to Canada, earlier there are some game studios in North America are now moved to Canada like Ubisoft, EA etc. but now there are many small independent studios are coming up in Ontario. The structure of the company is very importent need to have some core people and rest skill people will be on contract basis.

Funding resources for Game companies: main thing is how game company owner use his or her assets, By putting the proposal you able to get the tax credit from the ministry but the money you will receive only after 16 Months so the company need to have it’s own backup for sustain with the overheads. Need to concentrate on creating it’s own IP more than pitch for the game publisher as publisher will take time to approve the request. Mean while IP generation will help company to sustain.
Future game platforms: Mobile, online and free to play.
Employment in the game company:  For art track- a good portfolio is must. For programmers- create a game play and some small game concepts programmed by them to show the skills.

12:30 PM to 1:30 PM: Lunch break

1:30 PM: Export Development Canada- case study by Rob Caouette
Rob present What is EDC and how EDc will help the new SME's to improve their present business world wide.

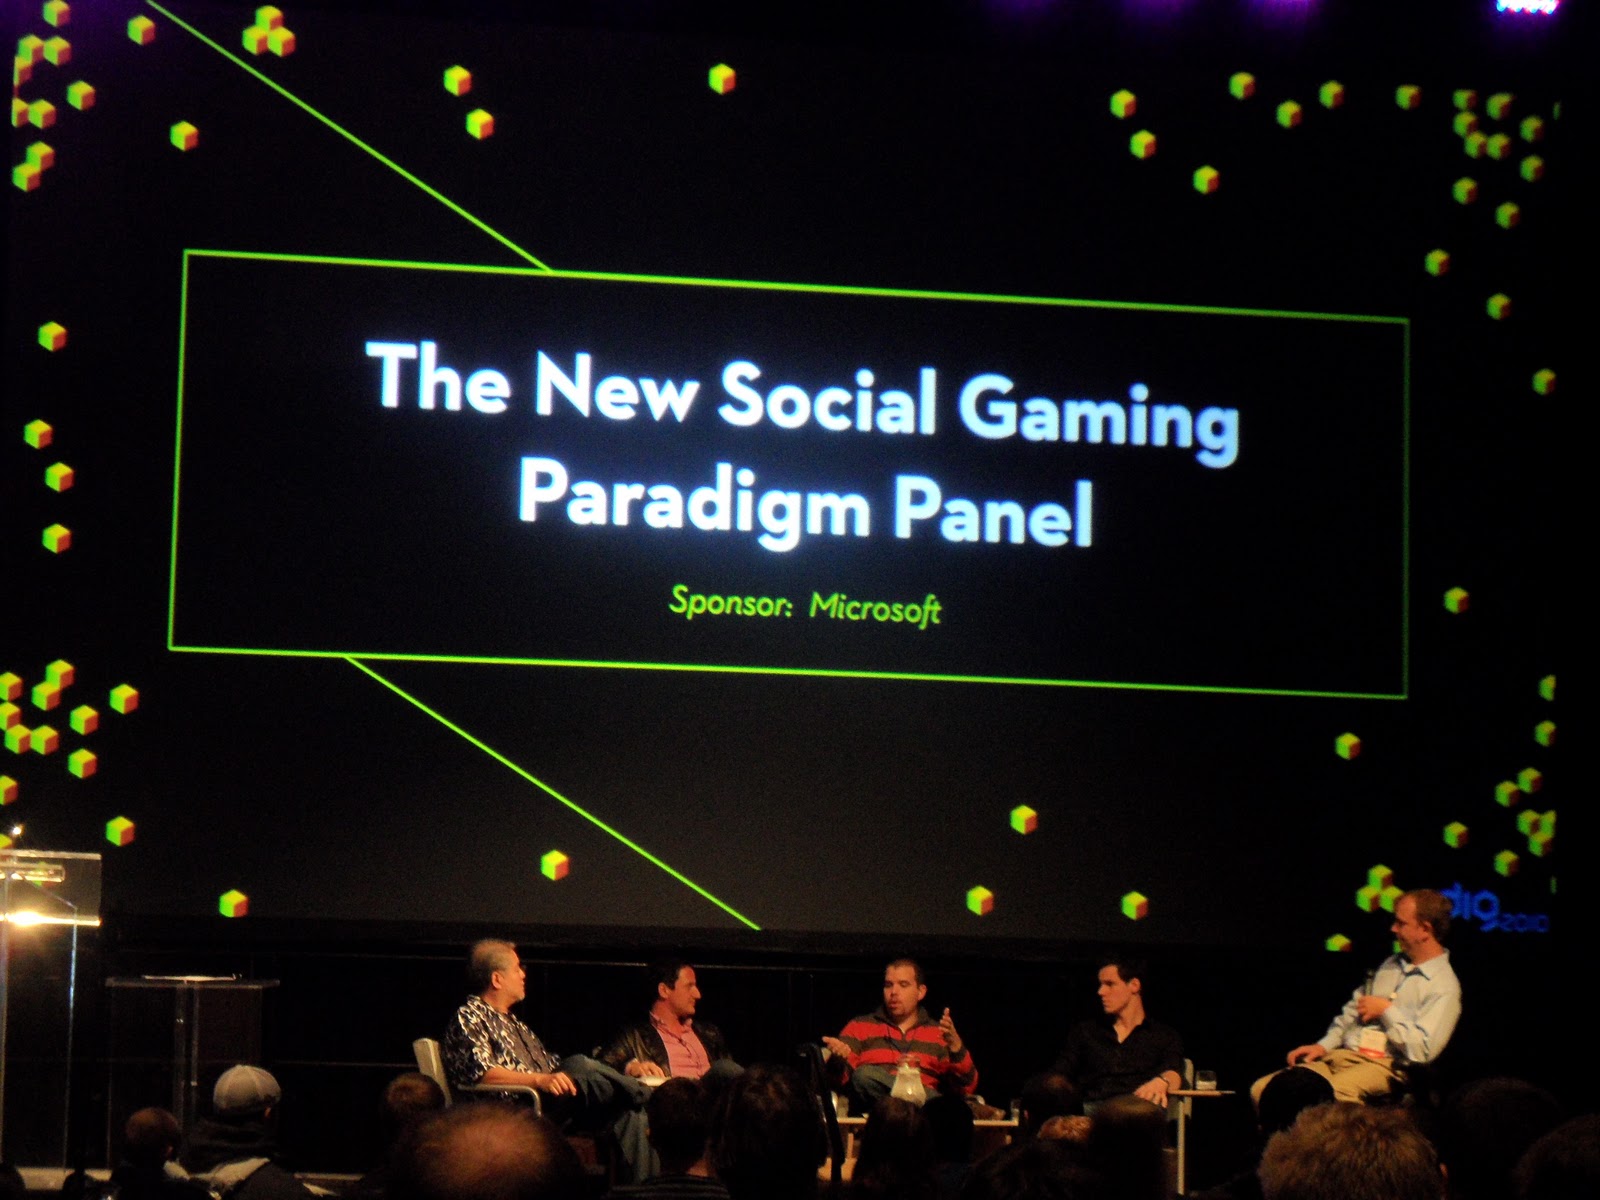
3:00 PM The New Social Gaming Paradigm Panel
Moderator : Fredrik Liliegren, Antic Entertainment
Members:
Greg Thomson: Tall Tree Games
Joey DeVilla- Microsoft
Bryce Hunter – Big Blue Bubble
Rob Balahura – Electronic Art
Francis Pelland – Social Gaming Universe
Topic discussed about current social gaming scenario like using Face book games, using Microsoft 7 games or iphone games..
What are the plus points and how people become addict to it.. but most  of the members suggest this social gaming is a short term success. After a while it become routine and player look for new games with more features etc.


6:00 PM DIG dinner and keynote presentation.
Welcome by : peter white – London Economic Development Corporation
Emcee- Mike Schmazlz – VP of Digital Extremes
Key note speaker: “Fail to success” by Jason Della Rocca – Premier Partners.
Jason emphasis on “why failure is important in success “ of the game. He given some of the examples of different successful game companies around the world, most of them fails in their early years. He said fails mean you are expanding your limits.. You learn from the mistakes.. and grow. If now you will be stagnant.. and difficult to grow.


9:30 Reception end then we check in to the hotel next to LCC

Wednesday, November 17, 2010

Day 43: Carating an CHARACHTER RIG 2

I continue working on the "animation rig" model animation rig is the model where all bones are connected to main bone using the IK/FK linking.. now it's time to create an "deform rig"
this is the last part where people convert the animation rig in to deform rig.
to convert the animation rig in to deform rig we need to select the auotmated rig and use capture proximity icon in the network view to connect all the bones to the external body.

this help "game artist" to modify and adjust the weight of the musles to attach to the bones.
we able to use the paint tool to create and modify the the weight of the musles.. lasty convert the nodes in to deform nodes to all bones are link to the msles of the body.

Test all the movement and animation of the different part of the human body.

Tuesday, November 16, 2010

Day 43: Carating an CHARACHTER RIG 1

Today, I stareted working on an character rig tutorial for a model called "zombi".
so first open the model and select shelf>"Charachter placer" for an charachter to stand in a circle, Then autorig> "Biped Spines" to generate the spine.
then select the color bone and from autorig menue select "biped arm" and "biped hand"
then add the "biped head" from neck bone.
lastly from the pelvic bone select the leg create "biped leg"


now select all the bones in the network view and select "biped auto rig" to convert  the rig to an animation rig. this rig help us to see all the connection of the body and connect the bones to each other.

Monday, November 15, 2010

Day 42: Digital asset work flow for rigging

I went throght the basic rigging toutorial, todays tutorial is based on how to create digital assets for rigging..
so we has an old man head with different expressions.

first we open the basic head and in the network view we add a blendshape node
in between the node we add sculpt node, followed by null node to modify the face.. look like puff

later add two file nodes..to import the differne texpression geometry like sad and angery face. all connect to the blend shape.

Last part is to create digital asset.. so select the node in the sceene and click on convert to a subnet. later seelct the subnet and RMB+clikc to create a digital asset. then put the path as embeded.. add the nodes of puff, sad and angry face from the parameter properties to existing parameter properties.. change the range from 0 to 1 then click accept to add it.
use the propertie smenu to test it.