Wednesday, December 15, 2010

Day 63: Open Dynamic Engine in RBD

Open Dynamic Engine is the best bart in RBD system in Houdini.
It start with an object "Tjack" use anothe robject a sphere and apply the point deforming function to put the "tjack" on each point of the sphere as shown in the image below.


Further most add Ground plane as an static object to as a resistance to the ODE object.
We use the ODE engine to calculate the force. which is much more easy to render and fast to calculate.


Lastly, I add camera and lights to the animation so able to render as a movie file.

Tuesday, December 14, 2010

Day 62: Using Stereoscopic Camera

"Steriopsis" is techniques to create a "depth of field. "Houdini uses the techniques is called "Anaglyph". Creating a image of red and blue tones.
The camera has left and right lence which able to render the two different images.

Create a normal model of an sphere and tube and ground plane as shown below. All the objects must apply some material. add lights in the scene. one light may able to create a "depth map " shadows.then add the "stereo camera"
when we add the camera, make sure that the "Zero parrallax" plane will reach the object the object infront may be destrot.

finally creat a small animation of the camera movement. which can be render using the mantra node.. Use th ecomposite view to open the individual left and right plane files and usen " anaglyph" nod eto composit ethe final render...
Export the file as quick time..

Monday, December 13, 2010

Day 61: Creating a ram and use IPR for cartoon

To start with open a 3D charachter IPR_start.hip

If we do a quick render the ramp color it look like hollow shading. now click on the render view to use the IPR render. Open the material pallete first create a skin color In opecity check remove the "check opacity tag and in base colour create a skin color as shown in the imadebelow so it gives two tones as in cartoon. to apply the color just drag and drop the color on the model body.

To create the dress color, seelct another simple ramp and drag in the render view to apply the color to the dress.
we able to modify the color by adjusting the base color int the properties.


To compare the old and new color we took a snapshot and use the compare node at the botton in the render view. finallyto add the hair color add another ramp. change the hair color shading to "blond" colorscheme as shown below.

see the model color render from all angle and save the final image file.

Friday, December 10, 2010

Day 60: Creating Procedural city

It was bit exiting to create a city from Satalite map
there are two ways to create the city from the satalite data one is by using the xml code and the other one is using the SVG image data.


I am describing the procedure of using the SVG image as it's a vector based image from able have data as an XML in the back end. we use the opnsource editor named inkscape to edit and manipulate the image to delte the unwanted text and the data from the image as shown below.

later we use the houdini's compositing manager to impot the file. we edit the file using the Hue to conver thte image to black and white, later use contrast to make image more black & white. finally
we use the rotoshape node with atop node to mask the unwanted area of the image. Add the null node to out the final output.

In the object node add the geometry then add trace to import the file from the img manager out. Then add group the imported data to a object. use polyextrude node to extrude the polygones to building height. we also use the random function so we will get differnt height buildings.

Thursday, December 9, 2010

Day 59: COPS Introduction

COPS stands for compositing operaters. Houdini has in built compositing which allow people to do many effects.

To use the COPS, In network view switch to IMG plane : compositing network
Default it has an comp1 node. so double click the node. to go in to compositing. Next press tab and add the "file" node to import pic. default it has a butterfly pic. we use this pic to do compositing. At the out add the color correction node.> change operation mask to : mask input :Cr. then add channel copy node, target c: input 1A

we add ramp change to verticle, connect the ramp1 and channelcopy1 node to multiply node as shwon in the image above so we get a gogod mixture of both in the alpha channel.  multiply node is followed by contrast node to adjust the constrast. then it merge to color correction node as shown in the image

finally we merge the two nodes in to rop_cop to oputput as a image file.

Wednesday, December 8, 2010

Day 58: VEX Introduction

VEX is stands for Vector Expression (VEX) and Vector Operator (VOP)in this exercise we learn the basic capabilities of VEX.

First start with VEX, so in network view, we start with a geometry node and in geopetry node add a line node
Then go to the VEX dropdown list and press tab to add the "SOP type" rename to sinWave builder.
In the VEX builder add "Vector float node" and "float to vector node and connect it as shown in the image.

later add new three parameter nodes like "frequency", "offset", and "amplitude" and connect it to "trignometic function and multiply function so we able to create the "sine" wave.
finally outout the wave with the controls as shown in the image below.

For the VOP we use the same line as base and add the "VOPsop" then dig in to the VOP sop and create new parameters like height and radius of the circle as shown below.

lastly add the circle node and connect it with the swep node to merge the connection. in line we use the distance value to put in the poits so to incrise the distance of the points.

Tuesday, December 7, 2010

Day 57: Creating a glow wire trail

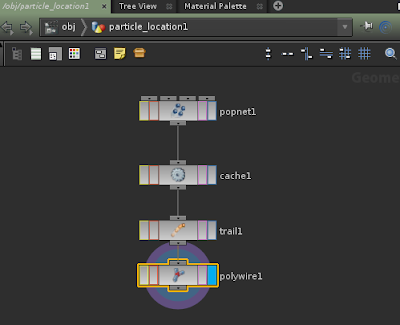
Creating a wire trail we start with an particle emitter. so drag a particle emitter from the shelf to scene.
when rewind and play, it emits the particles in all direction, we need to add the cache node.  Houdini will remember the earlier position of the points. we need to follow the cache by trail node.

Trail node helps to create new polygons also to help how many past points position to remember or shown in the scene. now it's time to add the poly wire node to convert the line to tube or any shape available. we able to create a different type of moving effect in the scene.

lastly add glow color for the poly wire mesh to enhance the glow.

Monday, December 6, 2010

Day 56: CHOPS Introduction


CHOPS (Channel operator) mainly use for Motion and audio network.

In object view is created a sphere. which able to animate using the audio wave
so go to Chopes and add the wave one is an sin wave then add another wave is called cosine wave
use the math operator to merge the both wave
Which create a new wave as shown in the image below


then use export to export the wave to the sphere object so the object able to stimulate on the "y" axis as shown in the animation below.

Friday, December 3, 2010

Day 55: Creating a procedural briedge

Staterd  houdini with an line curve in the scene. This curve able to modify and gove shape as shown in the image below .later add the "refine" node to make curve more points.


In the scene add another curve and create a half shape of the briedge polugone. us emirror to reflect on the another side of the shpe use "sort" node to make points in one line.

finally merge the road profile and road path to a sweep node.
add the poly cap to cover the end of the briedge.

Thursday, December 2, 2010

Day 54: Using L-system (Plant growth)

Today, I started working on a small palnt with flowers, buds and leafs.
I created a different approch, when I was started working on the plant.
I stated with a blank L-system and premise X.
Rule 1: X=F/(137.5)[&A]X
Rule 2: A=FT(-10)[&M]FT(-10)[^M]F/(90)[+A][-A][C]
Rule 3: C=FJ

Rule 4: J=K
where F - angeled, &M- first leaf, ^m- 2ND leaf,  90- roatation angle
+A -A – two branches, C- 3RD branch, J – is the bud, K – is the flower
A- current segment to produce C.


later add the "sphere" in to "J" input, "Flower" in to "K" input and "leaf" in to "L" input of the L-system. on the tube tag in geometry to give some thickness to the plant.

By using the generation tab 0 to 7 we able to geenrate the animation of the plant.

Wednesday, December 1, 2010

Day 53: Using L-system

What is L-system?
Its' a structer of imformation followed by premises and rules.
which helps to create or generate structers like plants. or organic shapes.
So it always start with a base system in houdini. the rules will be followed as below:

F is the base tree (premise)
X is the growth of the tree.
The rule1 growth is define
+F is the growth on right, -F is the growth on left

These rules will be writen in a sequence folloed by the generating the growth.
the basic object can be plug in as a referance to the plants as leaf (circle) or buds(sphere).

the tree will make shape after generating the poits and also by affing the thickness to the steam.. it's actually generating a ramdom numbers. so no two trees are look alike.

A plant generated using L-system